Page 2 of 2

WIP 04-14-2013

Posted: Tue Oct 04, 2022 11:52 pm
by Bill Plunk
One of the most interesting things about the Neubaus in my opinion is not just their rarity but their individuality. #10 has a special case of individuality and the kit provides for this with the decal markings. As you can see in the reference photo below (posted for discussion purposes only), the markings on this vehicle underwent different transformations depending on when in 1940 it is depicted. This particular photo is sometime after the end of April 1940 and includes what appears to be a crew-memorial dated 25.4.40 on the right rear turret. The #10 insignia have also been painted over but are still clearly visible on both the turret sides and rear.
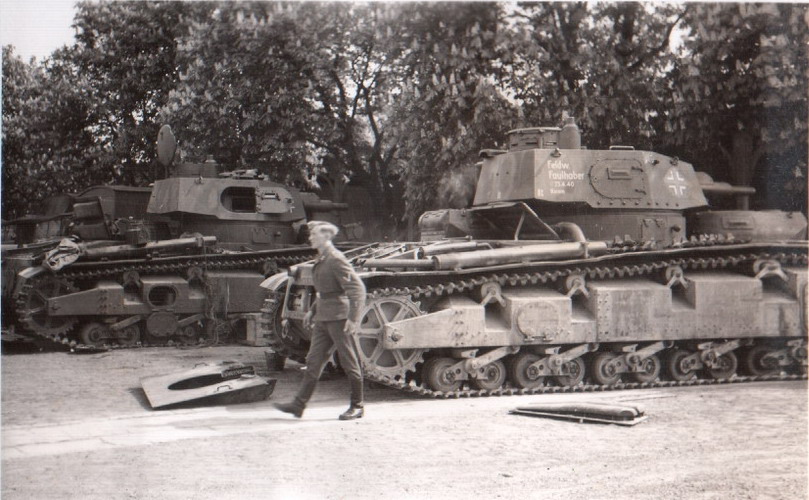
Image

The Dragon finishing guide provides for this but with the added twist that the decal markings are all in white...no panzer gray numbers are provided. So to recreate this particular look, some extra creativity is called for. I started by sealing the previous paint work with a coat of Future acrylic floor polish by airbrush and let that thoroughly dry before adding the markings. The vehicle doesn't have a lot of markings, but most are large/prominent. These were all applied using Walther's Solvaset to get them to snug down tight to the surface. The left side turret number had to be carefully cut at the top of the 0 to allow it to fit over the lifting eye but all the others fit perfectly.

Image

Image

Once the decals were set, they were sealed with another coat of Future by airbrush. Then the fun part began. Working with a fine detail brush and the lightened 80/20 Panzer Gray/Light Gray mix I'd sprayed earlier to create highlights, I hand painted over the white turret numbers. After the paint was dry, I added the three 'R' markings along with the Feldwebel Faulhaber memorial decal again using Solvaset. Once they were set, a final coat of Future sealed them all up and created a uniform surface for the weathering to come.

Image

Image

Image

Image

Next weekend I will be at the AMPS show in Atlanta so this one may not get an update for a couple of weeks as a result, but the next step will be to start in on the weathering.

WIP 04-28-2013

Posted: Tue Oct 04, 2022 11:53 pm
by Bill Plunk
While I had a lot of fun at the AMPS show in Atlanta last weekend, the Neubau needed some more attention to keep it on track and not feel so lonely. I started in on the weathering stages but with a dark vehicle the process is a little different. Normally the weathering will darken a finish but as dark as the gray/brown scheme is already dark colors, in this case the weathering lightens it. My goal is to create a dusty look to this big machine, so I started by applying an overall wash of thinned MM enamel Raw Sienna with a large #1 round sable brush. It doesn't have to be neat/even at this stage because of the stages to follow. I also applied the wash more heavily to the fenders and lower sides to provide a sort of demarcation between areas that would get different degrees of dirt/dust exposure.

Image

The Raw Sienna makes for a great foundation to apply dot filters over. The wash isn't sealed as it's not intended to remain as a separate layer but rather as an easier way to apply an 'earth tone' color that will be incorporated with the dot filters. I used MM enamel Panzer Schwarzgrau and Light Gray as my filter color choices. Small dots were applied with spotter brushes and then a square blender brush lightly dampened with thinner was used to blend away the dots and create a streaking/filter effect using repeated strokes in the direction I wanted the streaking to flow.

Here's the turret in the process of getting filters applied:

Image

And how it looks after the filters are done:

Image

This process was applied to the entire vehicle working small sections at a time. Because the enamel dots will dry much faster than oils, it's important to work small areas at a time but the advantage is that the faster drying time allows for a lot of progress in a relatively short space of time.

Image

Image

My experiment with the turret numbers also paid off handsomely. No issues whatsoever with the different layers playing nicely with each other during these weathering phases.

Next up will be a pin wash treatment to bring out some of the details and then on to the pigments!

WIP 05-05-2013

Posted: Tue Oct 04, 2022 11:54 pm
by Bill Plunk
Only a modest amount of progress to report in this session as bench time has been precious the past week. Still moving forward though and that's what counts! This round of effort dealt with applying a pin wash of MM enamel Burnt Umber to provide some depth to the raised details and add another layer to the finish. I used a small pointed brush to apply the wash and after it was dry, used the same brush and some clean thinner to make minor adjustments here and there.

Image

Image

Next up will be the pigment weathering for the lower hull and track runs.

WIP 05-11-2013

Posted: Tue Oct 04, 2022 11:54 pm
by Bill Plunk
With tomorrow being Mother's Day and all, this week's update takes place on a Saturday as a result!

Lots of great progress to report, the build is 99% complete. I picked up from the last round by applying a dull coat using MM Lusterless Flat in the spray can.

Image

After that had dried, it was on to the pigment weathering. I selected Mig Dry Mud to produce the dusty effects as seen in the reference photo posted earlier in the build. This was applied as a wet mixture using ordinary tap water with a drop of liquid dish washing soap added to break the surface tension. It's applied liberally using a sable brush to get it into all the various nooks and crannies.

Image

The wet mix is allowed to air dry and then the removal process begins. The first step is remove excess pigment using a round stiff bristle brush. I wear a dust mask during this process as inhaling the fine pigment powder is not a good idea. After the round brush, I use a series of smaller square and rectangular stiff bristle brushes to get into the harder to reach places and remove excess where necessary.

Image

Next more of the pigment is removed/adjusted using dry cotton swabs. A pair of tweezers is kept handy to remove any snagged fibers that get loose from the swab in the process.

Image

Because of the large hull sides on this vehicle, I wanted to show some dust streaking effects with the pigments. This was accomplished by using a water-dampened large sable brush and drawing the brush downward to pull the pigments into streak lines.

Image

Image

Last but not least, the final details were added for the large head lamp on the hull front in terms of the kit-provided clear lens. The smaller lights on the hull sides under the main turret received some 'lenses' of their own courtesy of small amounts of Testors Window-Maker glue added with a toothpick.

Image

I also took a set of walk-around photos to see if there's anything amiss for final adjustment. Will check tomorrow to see if I need to tweak anything before declaring this one 'done'.

Image

Image

Image

Image

Image

Completion 05-12-2013

Posted: Tue Oct 04, 2022 11:55 pm
by Bill Plunk
After a few tweaks and adjustments, this one was off to the photo booth for its final walk-around shots.

Image

Image

Image

Image

Image

Image

And just for the curious who wonder 'why don't we see more photos of the 2-tone in b/w?', here may be the answer ;) :

Image

Publication March 2015

Posted: Tue Oct 04, 2022 11:56 pm
by Bill Plunk
This project has been featured in the FineScale Modeler March 2015 issue.

Image

Image