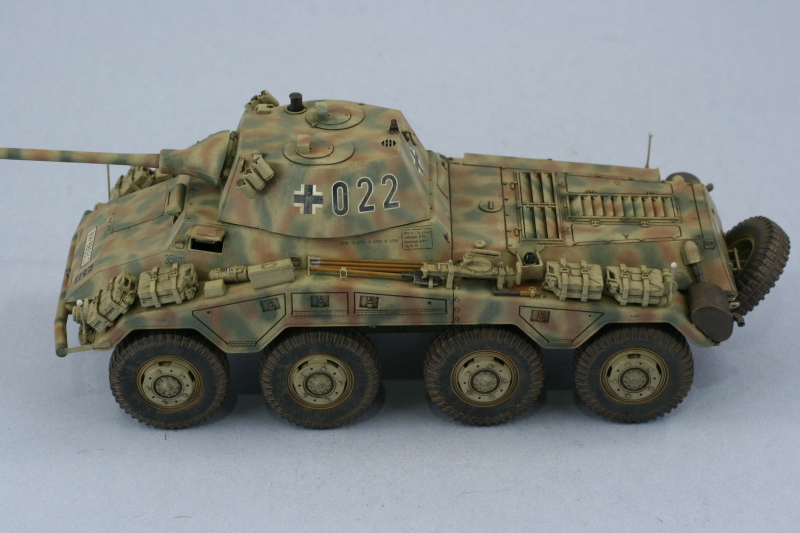
Work continued this weekend picking up from last time and continuing on with the remaining construction steps. Step 21 dealt with the assembly of the main gun breech and offers up a decent level of detail. Care has to be taken when attaching C9 and C27 to insure that the gun will remain able to elevate should you so desire. The instructions are a little vague on exactly where you can glue so test fits are a must before you commit.

Step 22 assembles the main gun and I swapped out the kit supplied styrene barrel for the Griffon replacement. The Griffon barrel is designed for this kit specifically and was a perfect fit into the mantlet with no modifications required. The only modification I made at this point was to drill out the solid muzzle on the coaxial MG before its installation. There isn't any interior detail for this MG, something that will be readily apparent if the turret hatches are left open. I'm closing all mine up so this isn't a worry to me in the long run.

Step 23 and 24 assemble the turret and install the main gun and there are several options presented in these steps. I opted to install the hatches in the closed position and will also install the large periscope in the raised position after painting to make it easier to detail it first. The same is also true for the normal periscopes for both the gunner and the loader. There is a small error in these steps to watch out for, the parts numbers for the base mounts for the smoke launchers parts C23 and C20 have to be installed in the reverse from what is called for in the instructions. I modified the turret antenna mount by clipping off the styrene rod portion and retaining just the base. The base was drilled out with a #72 finger drill in order to accept a brass antenna later on and then glued in place on the turret. The main gun was then installed and i was pleased to see that there's sufficient friction in the gun mount itself to support the gun without gluing it into a fixed position.

Step 25 is the final step in the instructions and calls for the assembly of the wheels and their installation. Since DML designed the hubs separate from the tires, I decided to remove all the parts from the sprues and clean them up but only assembled the hubs and left the tire halves separate for painting first. I opted for the outer hubs with the 5 lightening openings instead of the 2 and assembled all 8 hubs plus the spare tire for 9 in total.

The step also calls for the installation of the base for the stern antenna and this was added without difficulty, again modifying the base by drilling to accept a brass antenna to go with the kit supplied PE-star top later on. The turret was also test fitted to make sure everything lined up properly. I also decided to go ahead and install the jerry cans in their holders. I had to trim parts B11 on their undersides to get them to sit properly and mate up with the lower halves of the holders due to the fact that they have small ejector marks present. This was easily done with a #11 blade and then the holders were glued into place along with the cans. Originally I'd toyed with the idea of painting some of them panzer gray but decided it was too gimmicky and kept all the cans in dunkelgelb in the end.

That meant that it was now time for paint, so the turret was mounted separately on my all-purpose turret holder of choice, a cut-down toilet paper cardboard tube fitted with strips of blue painter's tape. A primer coat of enamel Italian Dark Brown was applied by airbrush to get the ball rolling.

Then the base coat of 50/50 enamel Light Gray/Panzer Dunkelgelb was applied.

Then came the camo patterns. I used a combination of the box art and the kit supplied guide for the 20 Pz. Div. Bohemia 1945 vehicle and free handed the pattern by air brush. I applied the rotbraun sections first using a 50/50 mix of Leather/Military Brown and then the olivgrun sections second using straight enamel Khaki. Once the pattern was on, I sprayed a mist coat of the base coat from a distance of about 12" to blend everything back together and give it a slightly faded look.


And the last item of business for the day...the wheels. I had attached the hubs and tire halves to long strips of painter's tape for easier handling. Both received a primer coat at the same time as the vehicle and then the hubs were base coated with the same lightened dunkelgelb mix. The tire halves were painted with enamel Gunmetal and then the tires and hubs were assembled together. The fit was a little tight so I used rubber bands and regular glue to insure an even join all around. Once set, I touched up the mid-tire channel gap with Gunmetal again by airbrush and everything was good to go.

Next steps will be to start in on the vehicle details and get them mounted.


