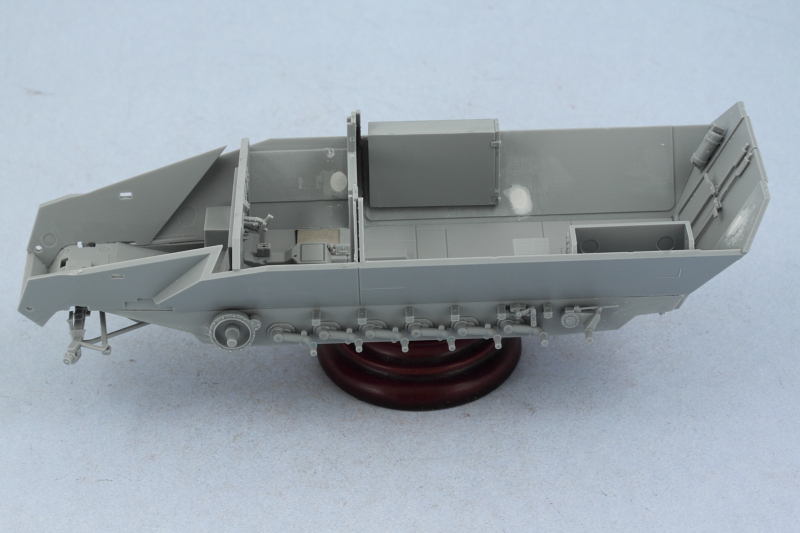
Lots of progress to report as the build continues. Step 5 begins work on the interior of the fighting compartment and deals mostly with the floor and driver's area. The /22 did away with the radio operator's position because of space/access constraints due to the Pak 40 ammo bins so I removed the "hump" that is the seat mount on that side. It's molded hollow so some Lion Roar scale tread plate was used to patch the hole along with some thin sheet styrene for the side of the raised central part. The driver's seat is dry-fit only and I also installed the later type wooden crew seat for the left side. The instructions don't indicate it but two holes need to be opened up in the floor for the seat bottom to mount in the correct spot.

Step 6 assembles the driver's instrument panel. I added all the various parts called for but left off the steering wheel and gas mask container so they could be detailed separately. After painting, the dash will get the instrument face decals provided by the kit.

Step 7 is a simple step, it adds the driver's instrument panel to the floor and then adds the floor to the vehicle's lower hull completed earlier. I held off doing that just yet because the floor and side hull panels need to line up properly with each other and it's easier to achieve that by installing the three of them together vs. separately.

Speaking of the lower sides, those came next in Step 8. There are a lot of molded-on locater marks that aren't needed for this variant, so those were removed with a micro chisel and sanded smooth. Ejector marks were filled with Squadron White putty and sanded down. I also added the large ammo bin and the seat back as well as the gunner's wooden jump seat.
The instructions are wrong in the placement of the side ammo bin as they point to one of the molded on marks as the correct position when the right locater marks are provided on the upper hull top...so some care is needed for the bin to end up in the right spot as both the height of the box and the position along the side matter when it comes time to add in the Pak 40 mount base in Step 15. The placement of the wooden jump seat is also critical on the other side for the same reason...so I used the blue-prints in Panzer Tracts 15-3 to help ensure I got it in the right spot and height as well.

Step 9 calls for the lower hull sides to be installed but I wanted to do that along with the rear hull plate and doors so I assembled them first as called for in Step 10. The doors were left in the closed position and putty used to fill the unused 2nd fire extinguisher slot.

Over in Step 12 the front portion of the Pak 40 mount makes an appearance but I went ahead and installed it, the floor, and the lower hull sides together in a single step to make sure everything was going to play nice and line up correctly.

Speaking of playing nice, I also decided to check the fit and alignment of the platform mount for the Pak 40. This is assembled out of multiple parts in Step 15 so that was taken care of and the mount tested along with the front bulkhead to make sure everything would fit correctly. As you can see, the fit/alignment with the other lower hull elements is tight so everything needs to be in just the right spot. I also added the smaller 5-round ammo box once the mount was glued in place so it could go in the right spot. The instructions are somewhat vague on its placement but the PT photos include a nice shot of the interior of a /22 showing how it should go. That photo also showed that DML got the placement of the hinges backward on the bin's lid so I made sure to mount it with the hinges oriented correctly.

I returned to Step 10 to assemble the front plate for the driver's visors. The kit provides the external visors as the earlier style with the ridged outer surface but the final version of the 251s had simplified these to be flat plates. That meant some careful trimming and sanding to flatten the plates down and the radio operator's plate was just a simple blank plate, so it received some putty attention to fill the back side mount point for the vision block and on the front side to fill the vision slit.

Last but not least, Step 11 deals with the upper hull and I went with the late version options featuring the single piece engine access hatch and side opening radiator access hatch. The front plate was added in and the edges blended in using a combination of liquid glue and light sanding. The top plate over the driver's area was also added but I left off the nose plate until the upper and lower hulls are joined together. Finally, I filled and sanded smooth the small mount marks for the crew jump-rail that were fitted on standard 251s but not a feature on this variant.

Next up will be assembling the Pak 40, a kit in itself!

